Below is just a small sample from the Origami dinghy plans which gives you a very
good idea of what to expect since all our plans work on the same principle. It's not unlike a 'join the dots' puzzle just
on a bigger scale! The 6 - 14 meg pdf plans can be purchased and downloaded in
moments. Our plans contain about 100 pages and well over 100 photos that were
taken during an actual construction. Masses of extra information and useful web links are also included,
and don't forget, for every set of plans we sell we will plant 5 trees on
your behalf! From just 30 Euros, our plans are excellent value
Sample a page from the plans
Before You Start
The marking out
procedure has been kept as simple and as consistent as possible. For the
most part, measurements will be made working from left to right.
Measurements are made starting from one point, and marking along the
tape measure. At each mark you will write a number. These numbers will
be joined up accordingly and the pattern will come to resemble a dinghy
and not just lots of lines.
Marking up is not hard but neither is it quick, so be prepared. All you
have to do is follow the instructions.
Follow the instructions carefully. Marking out is a very simple process
when you get the hang of it, so beware of ‘rushing’. Read through a
section before you actually do anything, making sure you understand the
instructions before you start marking or cutting.
To simplify matters, there is a photo of each finished piece at the
beginning of each section to give you an idea of what you are making.
A soft pencil is recommended for marking, since anything else you use
will be hard to remove before varnishing. You are going to make a lot of
lines on your wood so don’t sand it before you start - wait until it’s
all cut out. You will be told when to sand anyway. Don’t press hard
when marking. A soft pencil kept sharp will be fine.
Have a different colour ball point pen or pencil for the cut lines. Red
is used because it contrasts well against the other marks so there can
be no mistake about where to cut.
Many of the pieces are the same for both port and starboard, so often
you will make first one side, and then you will use this as a template
to make the other side.
To simplify things, a few often used words have been abbreviated:
BLHC = Bottom Left Hand Corner
TLHC = Top Left Hand Corner
BRHC = Bottom Right Hand Corner
TRHC = Top Right Hand Corner
FWD = Bow of boat
AFT = Stern of boat
TOP = Top
BTM = Bottom
PORT = The left hand side of the boat when you are at the stern looking
forwards.
STB = The right hand side of the boat when you are at the stern looking
forwards.
You will often be asked to mark Fwd, Aft, Top and Btm, on the pieces of
wood when marking out. This is to avoid the possibility of confusion. If
you’re not happy with all this writing on your work, you could use
masking tape and write on that instead.
Some bits are easier to mark out when orientated in a certain way. You
will be told whether to place the work in the ‘Portrait’ or ‘Landscape’
position before you start on each piece.
Please note: At the beginning of each section there is a photograph of
the finished piece to give you an idea of what you are making.
Marking Out
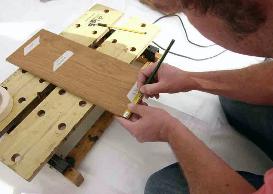
THE TRANSOM (4 pieces)
We are going to
commence by making the stern post/transom assembly. It is made up of
four identical pieces. We will mark out one, then cut it out and clean
it up. We will then use this as a template to make the other three.
Take one of the three 10mm thick planks and cut off four lengths,
measuring 410 mm long. Use your set square to ensure that you mark them
at 90 degrees to the edge of the plank.
Now take one of these pieces which should be 160mm x 410mm. Lay it in
front of you in the “portrait” position. To avoid confusion, label this
piece “transom template” and mark the top and the bottom.
Lay the tape measure from the BLHC across the bottom and mark twice,
once at 55mm and again at 105mm.
From your first mark (55mm) draw a line IN RED to the TLHC. Then draw a
line from your second mark (105mm) IN RED to the TRHC.
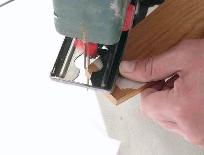
Now cut off the wood on the outside of the RED lines. You should have a
shape not dissimilar to a simple oar blade, (see above). You will find
it easier to cut a cleaner line if you start to cut from the top and saw
down, following the grain.
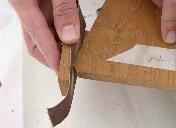
Clean up the cuts you have made with a plane. Note: Plane down from the
widest end to the narrowest end, following the grain.
Round off all 4 corners with about a 10mm radius curve. Cut out as best
you can with the jigsaw and finish with some 80 grit sandpaper and a
block.

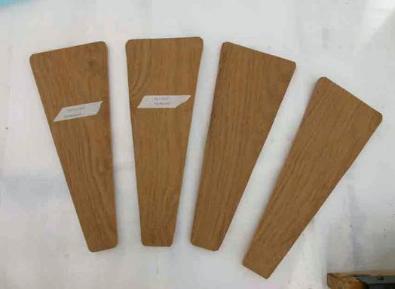
Now you have a perfect
template with which to mark the remaining three transom pieces.
Draw around your template on the other three pieces, cut out as before
but don't bother to clean them up, you'll do this after they are glued
together. Note: When marking around templates it's a good idea to clamp
the template to the wood. This ensures a perfect result.
Once the four pieces are made, choose the best piece with the nicest
grain. (This will be going on the outside of the boat) and mark it
'Transom Outside'. Now put it somewhere safe; you won't be needing this
piece for a while as it will be screwed on at the very end.
Do not glue this to the rest of the transom.
This sample is from the plans for Origami 6 folding dinghy, but the principle for all
our designs is the same.