People often ask, ‘What is the secret of varnishing?’ Unfortunately there’s no easy answer. But if you follow these guide lines and are patient, you will end up with varnish that will be the envy of everyone. It can be done, but you must realise that the more effort you put in, the better the results will be. Good varnish takes a very long time.
Tips
Always sand along the direction of the grain.
Always varnish along the direction of the grain,
Use a block with sandpaper where ever possible,
For the last coat always use a new tin,
Use only quality brushes,
Never use varnish straight from the tin. Decant into another container,
Always buy 3M sandpaper. You will save time and money,
Always wait 24 hours between each coat,
Always sand between coats,
Always use a tack rag.
Preparing the surface
Use something like 120 grit sand paper on bare wood. This is not so coarse that it leaves visible scratches, but it will leave a nice ‘key’ for the first coat of varnish. Use a block and sand in the direction of the grain.
Cleanliness is important. Less so in the early stages, but the nearer you get to your final coat the more you must pay attention, not only to the actual work but what is around it. If there is a huge pile of sawdust nearby, vacuum it up. Windy days are best avoided.
Add 50% thinners to the varnish. This allows the varnish soak into the wood. Apply the first coat, leave 24 hours.
Sand very lightly with 280 grit. Apply the second coat, mixing 75% varnish to 25% thinners.
Sand a bit harder with 280 grit. Use a block and change your paper often.
From now on, you must add the least amount of thinners as possible to the varnish. The object is to build the layers of varnish as thickly as possible. Varnish will only last if there are at least 8 good thick coats. Allow 24 hours between coats, and sand using a block and 280 grit between each coat. Don’t worry about getting a great finish at this stage. When you have 6 coats your varnish should be looking pretty good.
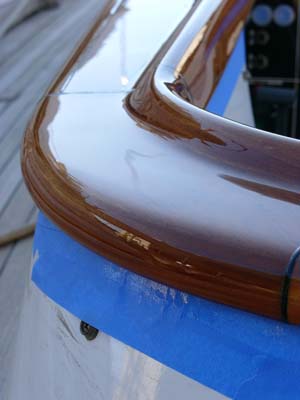
When you get to your final coat, make sure your brush is very clean. Wash it with plenty of water and washing up liquid, rinse well and allow to dry. Hang the brush up (that is what the hole is for in the handle). When it’s dry, you can vacuum it to make completely sure the dust is removed. You will always get a much better finish if your last coat is from a freshly opened tin. Old varnish needs more thinning, so the resulting coat will be thinner, offer considerably less protection and will show up your brush lines.
The most important thing for a dust free finish, asides from a clean environment and brush, is to make sure the surface you wish to varnish is dust free. Dust settles very quickly on a flat surface. It may look spotless to you, but there’s only one way to be sure and that is to use a tack rag. You should be able to buy these at your local chandler. Wipe the surface with it and any dust will stick to it.
You must work swiftly. Use a small amount of varnish on your brush and make more trips to the pot. Do not spend ages brushing the varnish around. It will do you no good. The best varnish is created by using the biggest brush possible, with very little ‘working’ of the varnish. When applied correctly, the weight of the varnish will drag out your brush lines like magic. This does not happen instantly. You must get into the habit of varnishing without looking back. After a few minutes it will have settled. If you miss a bit. Tough, do it later. Touching up varnish that has lost it’s wet edge never works. The same applies to insects that land in it. Leave them. They will brush off later and you probably won’t see their legs stuck in the finish. Varnishing a flat surface means you can apply a thicker coat of varnish than if the surface was vertical but always try to apply the thickest coat possible. If you have sags then you are trying to apply too much.
If possible, wait for a week or two before attempting the last coat. This will allow the coats underneath time to harden.
A quality brush is only expensive if you don’t clean it and have to throw it away. A well looked after brush will last years. Always clean your varnish brush after each use, in plenty of white spirits. Then wash with washing up liquid and plenty of water. Cleaning a brush properly should take a good 5 minutes.
There are three types of brush that can be particularly recommended. One is a badger, the same bristles that are often found in shaving brushes. Another natural bristle brush is the Purdy Ox Hair. Put simply, this is the Rolls Royce of varnish brushes. The last brush is also made by Purdy but it is a synthetic one. There are two sets of bristles, one set, short and thick and the other long and fine. The best of both worlds. Expensive, but beautifully made and easier to clean than natural bristles.
A note on sandpaper. Always use 3M Tri mite. Anything else just won’t do. Cheap paper clogs really quickly, which renders it useless and so you have to use more, which takes longer and costs more. Do yourself a favour and don’t compromise here. One could say the same about Varnish. Use Epifanes varnish which is great. There are other good brands but Epifanes stands out. In short you get what you pay for.